
How to Convert a Gas Water Heater to Electric

Switching fuels sounds intimidating, but the process is completely manageable once the facts are clear. For a house, a full replacement is the only safe option because residential gas tanks cannot be retrofitted. In a camper or RV, the job is much simpler, since an aftermarket conversion kit can thread directly into the existing propane tank.
What needs to happen next depends on where the tank sits and what the electrical panel can handle. A house requires a dedicated 240-volt circuit (a heavy wire running straight from the breaker box for one appliance only) and a properly capped gas line to prevent dangerous leaks. An RV setup, on the other hand, runs on standard 120-volt power without major rewiring. Here is how both methods work and what it takes to finish the project safely.
Can you put an electric element into your tank?
If you own a house with a gas water heater, you cannot screw an electric heating element into your existing tank. Residential gas water heaters feature a central flue pipe running through the middle of the cylinder to vent combustion exhaust out the roof. The burner sits at the bottom, and the tank walls lack the threaded side ports required for electric elements. Drilling into the tank ruins the protective glass lining, creates leak hazards, voids safety certifications, and violates local building codes. To switch a home to electric power, you must remove the gas heater completely and install a dedicated electric water heater.
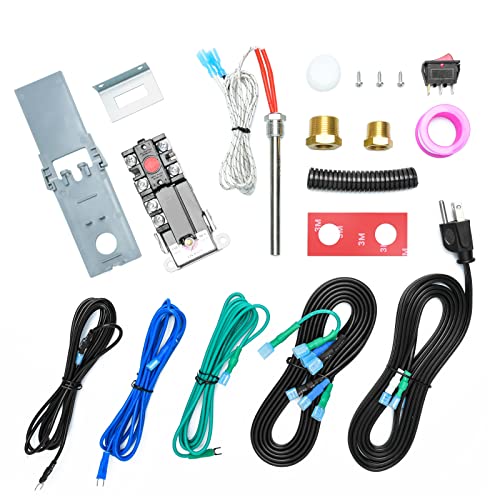
Recreational vehicles work differently. Most travel trailers and campers use compact six-gallon propane tanks made by Atwood or Suburban. These small tanks feature an accessible drain port (the threaded hole at the bottom used to empty the tank) on the vehicle exterior. Hybrid conversion kits are built specifically to screw an electric element directly into that drain port. This lets you heat water using standard 120-volt campground electricity while keeping propane as a backup option.
What electrical upgrades does a house need first?
Switching a residential water heater from gas to electric requires dedicated electrical wiring that gas units do not use. While a gas heater requires no electricity or only a standard 120-volt outlet for an exhaust fan, an electric tank heater draws heavy current to run its heating elements.
Before buying an electric tank, verify that your home electrical system meets these requirements:
- A dedicated circuit: This is a heavy wire running straight from the breaker box for one appliance only. It cannot share power with wall outlets, lighting circuits, or other appliances.
- A 240-volt double-pole breaker: Electric water heaters run on 240 volts, requiring a double-pole breaker that occupies two slots in your main service panel. Standard 40-gallon or 50-gallon tanks typically require a 30-amp breaker to support common 4,500-watt heating elements.
- Heavy copper wire: A 30-amp circuit requires 10-gauge copper wire, which usually has an orange jacket labeled 10/2 with ground. Thinner wire, such as standard 12-gauge or 14-gauge household wiring, will overheat inside walls and cause a fire risk.
- Panel capacity: Confirm your main electrical service panel has enough total amperage to handle the new 30-amp load alongside your stove, dryer, and central heating or cooling equipment.
- A local shutoff switch: Many building codes require an electrical disconnect switch within sight of the water heater if your main panel sits in another room or on a different floor.
How do you safely remove the old gas heater?
Removing a gas water heater requires isolating fuel, water, and exhaust connections safely. Follow these sequential steps:
- Shut off the gas: Find the gas shutoff valve on the supply pipe near the bottom of the heater. Turn the valve handle a quarter turn so it sits perpendicular to the pipe, which stops the flow of gas.
- Shut off the cold water: Locate the cold water valve on the pipe entering the top of the tank. Turn the handle clockwise to stop fresh water from entering.
- Drain the tank: Let the tank cool so hot water does not scald you. Connect a garden hose to the drain port (the threaded hole at the bottom used to empty the tank) and run the other end to a floor drain or driveway. Open a hot water faucet upstairs to break the internal vacuum, then open the tank drain valve to empty all water.
- Disconnect the vent: Unscrew the sheet metal screws securing the vent pipe (the duct carrying exhaust gases outside) to the draft hood on top of the tank. Slide the duct loose and set it aside.
- Disconnect and cap the gas pipe: Use two pipe wrenches to disconnect the flexible gas line from the appliance control valve. Thread a cap (a solid metal threaded plug that completely seals a gas pipe) onto the rigid gas supply pipe using yellow gas-rated thread tape. Turn the gas valve on briefly and brush soapy water on the cap to verify no bubbles form, then turn the valve off.
- Disconnect water pipes and remove the tank: Cut or unthread the cold and hot water pipes from the top of the tank. Use an appliance dolly to move the old gas heater out of the space.
How do you convert an RV propane water heater?
Converting an RV propane water heater allows you to heat water using campground electricity rather than refilling propane bottles. You can complete this conversion using an aftermarket hybrid kit designed for six-gallon tanks.
Follow these steps to install the kit:
- Disconnect power and gas: Close the valves on your propane tanks completely. Unplug your RV from shore power and disconnect your 12-volt battery bank to avoid any shock hazards.
- Relieve water pressure: Open the outside water heater access door. Lift the lever on the temperature and pressure relief valve near the top of the tank to vent internal pressure.
- Drain the tank: Unscrew the drain plug or anode rod from the drain port using a socket wrench. Let all water drain out. Flush the bottom of the tank with a rinse wand to remove loose mineral sediment.
- Install the heating element: Wrap the threads of the kit heating rod with thread tape and screw it into the brass adapter bushing. Thread the assembly directly into the drain port with a socket wrench until snug.
- Mount the thermostat: Place the kit temperature thermostat firmly against the clean bare metal of the tank wall using the supplied bracket. The thermostat monitors water temperature to turn the element on and off automatically.
- Wire the switch and power cord: Mount the on/off power switch inside your cabin or utility bay. Wire the switch between the thermostat and heating element according to the kit diagram. Route the 3-prong power cord to a nearby 120-volt outlet.
- Refill before turning on: Turn on your water supply and open an indoor hot water faucet until water flows steadily without sputtering air. Never turn on the electric switch while the tank is dry, or the element will burn out within seconds.
When should you call a licensed professional?
Working around high-voltage electricity and fuel gas carries real safety risks. Call a licensed professional when a task goes beyond basic mechanical connections:
- Installing 240-volt home wiring: Adding a double-pole breaker requires working inside the main panel, where live electrical parts remain energized even with the main breaker off. A licensed electrician will run the proper 10-gauge cable and secure all panel connections safely.
- Altering rigid gas lines: While capping a shutoff valve is simple, cutting, threading, or rerouting rigid black iron gas pipes requires a licensed plumber or gas fitter. Improper gas pipe work risks leaks, fire, or carbon monoxide accumulation.
- Pulling permits: Most towns require permits and inspections when changing an appliance fuel source or adding high-voltage circuits. A licensed professional ensures the installation complies with local safety codes, protecting your home insurance coverage.
- Sealing the abandoned roof vent: Disconnecting the old exhaust vent leaves an open pipe or hole in your roof. An HVAC or roofing specialist can cap and flash the roof opening properly so rainwater and animals cannot enter your home.
What should you look for in a conversion kit?
Choosing the right equipment depends on whether you are converting an RV tank or outfitting a residential home.
When selecting an RV hybrid electric conversion kit, look for these practical features:
- Proper bushing size: RV tanks use different drain port openings, typically 1/2-inch or 3/4-inch pipe threads. Look for kits that supply solid brass adapter bushings to match Atwood or Suburban tanks without stripping threads.
- Adjustable thermostat: Choose a kit that includes a thermostat that mounts directly to the tank wall. This regulates water temperature and cuts power if the tank gets too hot.
- Illuminated power switch: A lighted on/off switch makes it easy to see when the heating element is active, helping you avoid dry firing when emptying the tank.
- Durable element construction: Select heating rods made from corrosion-resistant metal alloys that resist lime and mineral buildup.
For a house, remember you are buying a complete electric water heater rather than an add-on kit. Choose a tank capacity that matches your daily hot water demand and confirm your panel can support the electrical load. If you are heating an alternative space like a camper or small manufactured dwelling, you might also look at options like a heater for a mobile home or compact solutions like the best heater for van life to manage overall electrical use while staying comfortable.

- BWP Score9.5
BWP Score is a ranking system developed by Bestwinterproducts.com. BWP score has no relationship or impact from any manufacturers or sales agent websites. Learn more
- BrandMQLPXI

- BWP Score7.2
BWP Score is a ranking system developed by Bestwinterproducts.com. BWP score has no relationship or impact from any manufacturers or sales agent websites. Learn more
- BrandCamco
- BWP Score8.3
BWP Score is a ranking system developed by Bestwinterproducts.com. BWP score has no relationship or impact from any manufacturers or sales agent websites. Learn more
- Brandbriidea
Last update on 2026-10-31 / Affiliate links / Images, Product Titles, and Product Highlights from Amazon Product Advertising API
FAQs
Will switching to electric save money on utility bills?
In many areas, natural gas is less expensive per unit of heat than electricity, so a standard electric tank water heater can slightly raise monthly utility bills. However, if your home uses solar panels, an electric tank lets you heat water using your own clean power. In an RV, an electric kit saves money by running hot water on included campground electricity instead of burning expensive propane.
Can you leave the old gas vent pipe open?
Never leave an abandoned gas vent pipe open. An open duct acts like an open window, pulling cold outdoor air into your home and letting heated air escape. Rain, moisture, and pests can also enter through the opening. The vent pipe should be removed and capped with approved sheet metal, and any roof penetrations must be sealed watertight.
Why does an RV heating element burn out instantly?
An electric heating element transfers intense thermal energy directly into surrounding water. When electricity flows through an element in an empty tank, the metal rod cannot shed the heat and burns out within seconds. This damage is permanent and requires replacing the element. Always verify that water flows steadily from a hot faucet before turning on the power switch.
How long does an electric water heater take to warm up?
Electric heating elements warm water slower than gas burners because gas flames produce higher heat output. A standard six-gallon RV tank with an electric kit takes about 45 to 60 minutes to reach shower temperature. A 50-gallon home electric tank typically takes one to two hours to heat a full tank of cold water completely.


Top 12 best white electric fireplace 2026

Best Clear Ski Goggles Men 2026 For Sharp Vision On Slopes

Top Best Cordless Electric Snowblower 2026 - (Latest)

Best Warm Winter Scarves 2026 For Cozy Comfort

Best Green Ski Goggles 2026 For Clear Vision On Slopes

12 Best Corner Electric Fireplace 2026: My Ultimate Guide To Pick One

Best Battery Powered Snow Blower 2026 For Effortless Snow Clearing

Best Ski Goggles Under 30 Inches For Crisp Vision And Comfort





