
How to Safely Clean Out Your Hot Water Heater

The most reliable method is a yearly drain and flush with an ordinary garden hose to wash out loose mineral scale from the bottom of the tank. The exact technique changes depending on whether the system is a standard home tank, a compact RV heater, or a wall-mounted tankless unit. Hard water naturally leaves behind a sandy grit that settles over time, causing rumbling sounds and trapping heat where it does not belong. Rinsing this layer away protects the heating parts and restores quick, quiet warming.
Equipment type and tank age decide the exact approach. Electric units need the breaker shut off immediately so the heating rods do not burn out dry, while gas valves just need a turn to the pilot setting. Neglected tanks over eight years old also require a gentle touch, as aggressive flushing can sometimes dislodge scale that was keeping old rust pinholes from leaking. Here is how to clean out the system safely without flooding the floor or cracking a valve.
Mineral Buildup Traps Heat and Causes Loud Rumbling
Every time fresh water enters your home, it carries tiny amounts of dissolved minerals such as calcium and magnesium. These minerals are harmless to drink, but heat changes their physical structure. As the water warms up inside your heater, those microscopic mineral particles separate from the liquid and settle directly onto the bottom of the tank. Over several months, this material forms sediment, which is a sandy mineral buildup that hardens into a dense layer of gravel and stone.
When this layer blankets the bottom of the tank, it creates a physical barrier between the heat source and your household water. In a gas model, the burner flames heat the metal floor of the tank, but that heat cannot easily push through an inch of hardened rock. In an electric unit, the sediment buries the lower element, which is the electric heating rod inside the tank. In both designs, small pockets of water get trapped under the rock layer, where they reach a boiling point and violently bubble up like water boiling under a tight lid. That boiling action creates the loud popping, knocking, or rumbling sounds you hear coming from your utility closet during a shower.
Beyond annoying noises, this thick mineral barrier makes your equipment work much harder than necessary. Your system must run for longer cycles just to produce an average shower, which drives up monthly utility bills. For electric models, when an electric heating rod sits buried in sandy grit, the metal cannot shed its warmth into the surrounding water. The rod overheats, buckles, and burns out prematurely. For gas tanks, the metal base overheats repeatedly, weakening the protective glass lining and paving the way for rust and premature tank failure. Cleaning out this grit once a year stops the noise, restores quick heating, and protects the tank metal.
Shut Off Power and Cold Water Before Starting
Safety comes first whenever you work with high temperatures, high water pressure, and household power. Water heaters store dozens of gallons of scalding liquid, and electric models carry enough voltage to cause serious injury. Before you loosen any fittings, take a few minutes to walk through this preparation checklist:
- Cut the electrical power: Walk to your main electrical panel and find the two-pole circuit breaker labeled for your water heater. Flip the breaker switch firmly to the Off position. Never drain an electric tank while power reaches the unit, because an exposed electric heating rod will burn out and crack within thirty seconds if it runs dry in open air.
- Turn down the gas supply: If you have a gas model, look near the bottom of the tank for the thermostat control box. Rotate the main temperature dial all the way down to the Pilot setting. You do not need to cut the gas line completely, but the burner must not fire while the tank empties.
- Close the cold water inlet: Look at the top of your tank to find the cold water supply pipe. Turn the shutoff handle until it stops. If you have a round wheel valve, turn it clockwise until tight. If you have a straight lever, pull it a quarter turn so the handle sits perpendicular across the pipe.
- Allow the water to cool: Water inside a working tank routinely sits between 120 and 140 degrees Fahrenheit. Hot water can soften cheap garden hoses, weaken plastic fittings, and cause severe scalds if a hose slips off the fitting. Turn off the heat source several hours before cleaning, or run a hot bath to drain the hottest water out of the upper section before you begin.
Connect a Garden Hose to Flush the Tank Clean
Once the power is off and the water has cooled to a safe temperature, you are ready to drain the minerals out through the bottom fitting. Follow these steps in order to empty the tank and rinse away the remaining sand:
- Attach your garden hose: Locate the drain valve, which is the hose spigot at the bottom of your tank. Inspect the threads for corrosion, then screw the female end of a standard garden hose tightly onto the spigot. Make sure the hose has a fresh rubber washer inside to prevent leaks across your utility floor.
- Route the hose discharge: Run the other end of the hose to a safe drainage spot that sits lower than the base of your heater. A basement floor drain, an outdoor driveway, or a deep laundry tub all work well. If your tank sits in a basement with no floor drain, you may need to direct the hose into a portable utility pump to push the wastewater up to ground level.
- Break the internal vacuum: Water will not flow freely out of a sealed tank due to suction, similar to holding your finger over the top of a drinking straw. Walk to the highest bathroom in your home and open the hot water tap on the sink or bathtub. This allows air to enter the plumbing pipes, breaking the vacuum and letting gravity pull the tank water down through your hose.
- Open the bottom drain valve: Turn the handle on the hose spigot counterclockwise. Water will begin moving through the hose. Inspect the discharge at the other end. The first few gallons often look brown, milky, or gritty as loose debris exits the tank floor.
- Run a cold water rinse burst: Once water stops flowing and the tank is empty, keep the bottom spigot wide open. Turn the cold water supply handle at the top of the tank back on for about thirty to sixty seconds. This sudden rush of cold water shoots down the internal dip tube, churning up the settled scale that is stuck to the tank bottom and sweeping it straight out the hose.
- Repeat until the discharge runs clear: Shut the cold supply valve, let the tank drain out again, and check the exiting water. Repeat these short thirty-second blasts of cold water until the water leaving the hose looks clear and you no longer see sand particles tumbling out.
- Refill the tank before restoring power: Close the bottom hose spigot completely and disconnect your garden hose. Turn the cold water inlet valve fully open to refill the vessel. Keep your upstairs hot water tap open during this step. As the tank fills, it will push trapped air out through the open faucet. When water flows from that faucet in a steady, unbroken stream without coughing or sputtering air, the tank is completely full. Finally, flip the electrical breaker back on or return your gas knob to your preferred heat setting.
Clear Stubborn Drain Valve Clogs Without Breaking the Fitting
Homeowners often encounter an issue where they open the bottom spigot, but nothing comes out of the hose. This does not mean your tank is already clean. Instead, large chunks of hardened calcium have tumbled down and wedged themselves tightly behind the opening of the drain valve. Knowing how to safely dislodge this debris protects your room from unexpected flooding.
Many modern water heaters use inexpensive plastic drain valves. These plastic spigots become brittle after years of contact with hot water. Never grab a large steel pipe wrench and force a stuck plastic valve handle, because the entire threaded neck can snap off flush against the steel tank wall. If that happens, dozens of gallons of water will flood across your room with no way to shut it off except the main water meter.
To clear a sediment blockage safely, try using a short burst of backpressure first. If you have an outdoor hose connected to an outside spigot with good water pressure, you can connect it to the tank spigot with a female-to-female adapter for five seconds. Opening both faucets forces a small blast of municipal water backward into the bottom of the heater, knocking the heavy stones away from the valve opening. Once you disconnect that pressurized line and reopen the tank spigot, gravity can pull the loose slurry out through your drain hose.
If you do not have a back-flush connection, shut the drain valve and unscrew your hose. Place a wide, shallow plastic basin directly underneath the spigot. Open the valve slightly and gently slide a short piece of stiff, insulated wire or a clean, straightened wire coat hanger into the spigot opening. Carefully poke at the opening to break up the chalky dam. The moment the wire crushes through the mineral blockage, hot water and sand will surge out into your basin. Pull your hands back immediately to avoid burns, close the spigot, reconnect your long garden hose, and resume your drain cycle.
Rinse Small RV Tanks and Descale Tankless Coils
Not every home relies on a standard forty-gallon or fifty-gallon storage tank. Small campers, travel trailers, and whole-home tankless units require different maintenance methods because their internal shapes do not drain the same way as upright residential cylinders.
Recreational vehicle heaters typically hold only six or ten gallons of water inside an aluminum or steel chamber. These compact heaters do not feature a standard garden hose spigot at the bottom. Instead, you must use a socket wrench to unscrew the plastic drain plug or the sacrificial anode rod located on the exterior access panel. Because the drain hole is small and sits slightly above the floor of the vessel, gravity alone will leave a thick layer of loose white lime sitting inside the tank curves.
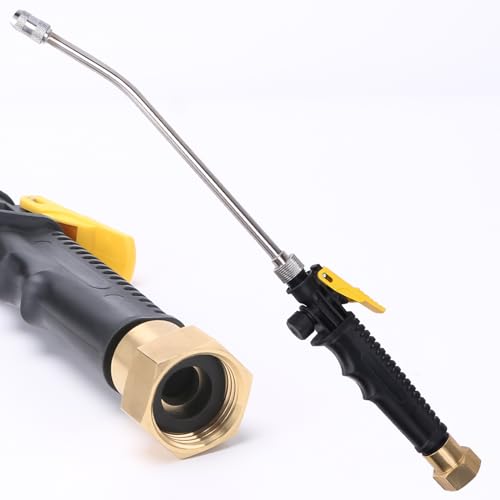
The best way to clean an RV unit is by using an RV water heater flush wand. This narrow metal tube connects directly to your outdoor water hose and slips straight through the drain plug hole into the core of the tank. As you move the wand back and forth, its angled tip sprays high-pressure water forward and to the sides. This powerful water spray dislodges chalky buildup and flakes of degraded anode metal from the corners and washes them out the open drain hole. Keeping these compact camper tanks clean is just as vital as choosing the right heater setup for van life, since clean mobile heating systems ensure dependable comfort in small living spaces.
Tankless water heaters do not store sitting water at all. Instead, cold water rushes through narrow copper or stainless steel heat exchanger tubes while powerful gas burners or electric coils heat the pipe walls. Over time, calcium plates directly onto the inside of these thin pipes, restricting household water flow and preventing proper heat transfer. You cannot clean a tankless unit with a garden hose gravity flush. Instead, you must isolate the heater from your home plumbing using dedicated service valves, hook up two washing machine hoses to a small submersible pump in a five-gallon bucket, and circulate a descaler through the heating coils for forty-five to sixty minutes.
This mineral-dissolving cleaner circulates through the internal pipes, chemically breaking down the rock-hard calcium without harming the metal tubes. You then flush the unit with clean water for several minutes before returning it to service. For owners of manufactured housing who need to inspect plumbing alongside finding the right heating setup for a mobile home, remember that compact utility closets demand extra care to ensure water drains completely outdoors rather than pooling inside tight interior subfloors.
Stop if You See Deep Tank Rust or Leaks
Cleaning out mineral scale restores performance, but it can occasionally reveal hidden structural damage in older, neglected systems. Before and during your cleaning process, pay attention to physical warning signs that tell you to stop what you are doing and consult a licensed plumber.
Check these critical risk factors before proceeding with a flush:
- The eight-year neglect rule: If your storage tank is more than eight to ten years old and has never been flushed, clearing out heavy sediment carries a real risk. Over many years of sitting undisturbed, heavy calcified rock can actually bridge over tiny corrosion pinholes in the steel floor. When you flush away that heavy rock layer, you may expose those open rust pits, causing the tank to start leaking from the bottom immediately after you finish.
- Water that stays dark orange or red: During the flushing steps, the water should transition from cloudy and sandy to completely transparent. If the water remains deep red, rusty brown, or smells heavily of corroding metal even after twenty gallons have passed through, the steel tank walls are rusting out from the inside. Cleaning cannot save a tank whose internal liner has failed.
- Damp insulation around fittings: Look closely at the drain valve threads, the cold water inlet nipples at the top, and the temperature and pressure relief valve (the safety escape valve near the top of the tank). If you spot crusty green oxidation, bubbling paint, or damp foam insulation, moisture is seeping through the shell.
- Plastic spigots that will not turn: If a plastic drain spigot resists gentle hand pressure, never hammer or force it. A cracked fitting under water pressure creates an emergency flood that can ruin nearby walls and flooring.
If you see active water droplets falling from the underside of the outer metal jacket, stop your cleaning process. Shut off the cold water supply valve, turn off the electrical breaker or gas knob, and call a qualified professional. A leaking tank body cannot be patched, welded, or glued; replacing the aging unit is the only safe way to protect your home from sudden water damage.
Pick Simple Rinsing Wands or Powders for Stubborn Scale
Standard household storage tanks usually need nothing more than clean municipal water pressure and a standard garden hose to clear out loose gravel. However, when you deal with narrow heating passages or compact chambers, specialized cleaning accessories help break free stubborn buildup that regular water flow cannot budge on its own.
For small RV tanks, look for a dedicated tank rinser wand built with a rigid metal tube and durable brass garden hose fittings. Plastic wands can snap easily if bumped against the narrow opening of the tank, leaving broken pieces stuck inside your unit. A metal tube with an angled nozzle that sprays both forward and sideways lets you blast water into the hidden corners of the tank, knocking down heavy scale deposits and degraded metal residue that gravity draining leaves behind.
For tankless water heaters, look for non-corrosive descaling powders or solutions that are specifically formulated and listed safe for domestic drinking water systems. These cleaners dissolve stubborn limescale, calcium, and mineral scale without eating away at delicate copper tubing or internal rubber seals. Make sure to confirm that any descaling product dissolves completely in water so it circulates smoothly through a small utility pump without clogging your hoses.
Never pour aggressive commercial pool acids, harsh drain openers, or unapproved chemicals into a standard residential storage tank. Standard tanks feature a thin glass or porcelain interior glaze designed to prevent water from touching bare steel. Harsh industrial acids will etch, crack, and strip this protective barrier, ruining the tank within weeks. Simple, clean water flushes remain the safest, most effective maintenance routine to keep your hot water flowing freely year after year.

- BWP Score9.3
BWP Score is a ranking system developed by Bestwinterproducts.com. BWP score has no relationship or impact from any manufacturers or sales agent websites. Learn more
- BrandVANPET
- BWP Score8.6
BWP Score is a ranking system developed by Bestwinterproducts.com. BWP score has no relationship or impact from any manufacturers or sales agent websites. Learn more
- BrandVANPET

- BWP Score8.7
BWP Score is a ranking system developed by Bestwinterproducts.com. BWP score has no relationship or impact from any manufacturers or sales agent websites. Learn more
- BrandKEXGUSS
Last update on 2026-10-15 / Affiliate links / Images, Product Titles, and Product Highlights from Amazon Product Advertising API


Best Warm Winter Scarves 2026 For Cozy Comfort

Best Green Ski Goggles 2026 For Clear Vision On Slopes

12 Best Corner Electric Fireplace 2026: My Ultimate Guide To Pick One

Best Battery Powered Snow Blower 2026 For Effortless Snow Clearing

Best Ski Goggles Under 30 Inches For Crisp Vision And Comfort

Best Cooling Scarf 2026 For Instant Relief And Comfort

Fake Snow for Grass: Create a Realistic Winter Lawn Display

Dimplex Prism Wall Mount Fireplace: Sleek Heat With Modern Flame Style





