
How to Service a Tankless Water Heater

Lukewarm showers and blinking error codes can feel alarming, but routine upkeep on these heaters is simple and safe to handle on your own. Basic maintenance means shutting off the power, then circulating plain white vinegar through the heating chamber for forty-five minutes to dissolve mineral buildup. Rinsing the lines and cleaning the mesh filter finishes the job and restores steady warmth.
How often this flush needs to happen depends on your local water hardness, which can push cleanings from once a year down to every six months. The procedure also shifts slightly depending on whether the appliance runs on gas or electricity, since each power source requires a distinct shutdown step. Most crucially, doing this at home requires service isolation valves (small shut-off taps under the unit that allow hose connections). The steps below show how to clear the lines safely.
How often does your tankless water heater need service?
Most tankless water heaters need a thorough flush every 12 months. If your home has hard tap water or a private well, service the unit every 6 months. Hard water carries dissolved minerals like calcium and magnesium. When cold water enters the heating chamber, which is the compact metal block where water warms up quickly, high heat bakes those minerals onto the pipe walls.
Over time, this crust builds up like scale inside a tea kettle. The mineral crust acts like an insulating blanket. It traps heat away from the water and forces your burners or electric heating elements to work harder.
You can usually tell your water heater needs attention before a calendar reminder goes off. The shower may swing from hot to lukewarm without warning. You might hear humming, rumbling, or whistling noises when a faucet runs. The digital screen might also flash an error code for low water flow or high internal temperatures. Dissolving mineral buildup with vinegar removes that crust before it chokes your pipes or damages the heating chamber.
What supplies do you need before getting started?
You do not need specialty tools to clear out mineral scale. Most home closets and local hardware stores have everything required:
- A 5-gallon bucket: A clean plastic bucket holds the cleaning vinegar and catches draining water.
- Two short garden hoses: Use 4-foot to 6-foot hoses with standard female hose connections on both ends. Washing machine fill hoses work well.
- A small submersible utility pump: A compact electric pump sitting in the bucket circulates the cleaning liquid through the unit.
- Four gallons of plain white vinegar: Food-grade white household vinegar dissolves calcium scale effectively without harming copper, brass, or rubber seals.
- An adjustable wrench: A simple wrench loosens drain caps and the filter plug.
- A small bowl and an old toothbrush: These help scrub loose grit from small filter parts.
Never use chemical drain openers, bleach, or muriatic acid. Strong industrial chemicals eat away the thin copper walls inside the heating chamber. Plain white household vinegar is safe, inexpensive, and gentle on home plumbing.
How do you flush the heating chamber step by step?
Flushing takes about an hour. Pick a time when nobody in the house needs hot water, then follow these ordered steps:
- Cut all power and fuel: Safety comes first. For an electric unit, switch the circuit breaker to the off position in your main electrical panel. For a gas unit, turn the manual gas valve handle 90 degrees across the line and unplug the power cord. The digital display screen should turn completely dark.
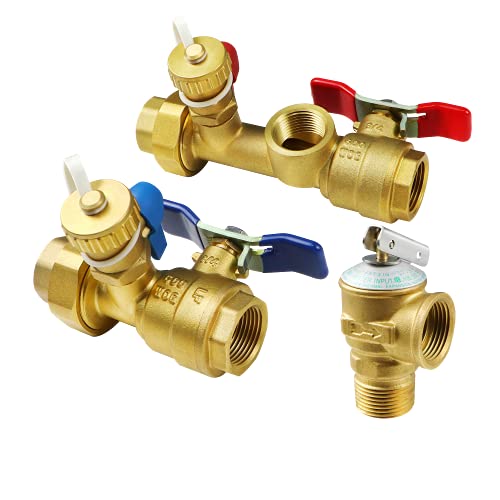
- Shut off the water flow: Turn the blue cold water handle and the red hot water handle until both sit perpendicular to the pipes. These are your main isolation valves, which are shut-off taps for maintenance hoses. Closing them stops household water from entering the unit and keeps vinegar out of your home faucets.
- Remove the service drain caps: Place a rag or small container under the brass service ports on the valve bodies. Unscrew both caps by hand or with a wrench. A small splash of warm water will drain out as pressure drops.
- Hook up the pump and hoses: Connect one hose to the pump discharge port and thread the other end onto the cold water service port. Attach your second hose to the hot water service port, placing the open end loose into the 5-gallon bucket.
- Fill the bucket with vinegar: Pour 3 to 4 gallons of white vinegar into the bucket until the pump is fully submerged. Running a utility pump dry can burn out its motor.
- Open the service port valves: Turn the small levers on both service ports so they line up with the hoses. This opens the path into the heating chamber while keeping main house water lines closed.
- Turn on the pump: Plug in the submersible pump. Vinegar will travel through the cold inlet, circulate through the heating chamber to dissolve mineral buildup, and return through the hot hose into your bucket.
- Run the cycle for 45 to 60 minutes: As the vinegar breaks down scale, the liquid will turn cloudy or blue-green. Small white mineral flakes will settle at the bottom of the bucket.
- Rinse with fresh water: Turn off and unplug the pump. Dump the dirty vinegar down a household drain. Close the cold service port valve, disconnect that hose, and leave the hot hose draining into the empty bucket. Slowly open the main cold water supply valve. Fresh water will rush through the heater, pushing out residual vinegar and loose grit. Let it run for 3 to 5 minutes until the water smells completely clean.
- Close up and restore power: Close the hot service port valve, remove the hose, and tighten the brass caps back onto both ports with your wrench. Reopen both main water valves fully. Turn the fuel and electricity back on, then run a hot water faucet for a minute to bleed out trapped air bubbles.
How do you clean the water filter screen?
Many homeowners flush the heating chamber but forget the inlet screen. The inlet screen is a small mesh filter for pipe debris located where cold water enters the unit. It catches sand, rust flakes, and loose mineral chips before water enters the heating chamber. A clogged screen triggers flow-rate errors even after a fresh flush.
Clean the screen in a few quick steps:
- Confirm water is off: Ensure the cold water isolation valve remains completely shut.
- Place a small bowl underneath: Put a rag or bowl directly under the cold inlet to catch a small cup of residual water.
- Unscrew the filter plug: Turn the plug counterclockwise using your fingers or an adjustable wrench until it slides free.
- Rinse and brush the mesh: Pull the cylindrical screen out of the housing. Rinse it under a running faucet and scrub away trapped grit using an old toothbrush.
- Inspect the rubber gasket: Check the rubber seal ring on the plug. If it looks cracked or flattened, replace it to prevent slow drips.
- Reinstall the filter: Slide the screen back into the port, thread the plug by hand, and snug it gently with your wrench without overtightening.
What if your heater does not have service valves?
If solid copper pipes or plastic tubing connect straight into your heater without threaded side ports, your system lacks isolation valves. Some builders skip them to save money during initial installation.
Without these shut-off taps for maintenance hoses, you cannot safely pump vinegar through the heating chamber. Never attempt to push vinegar through household sink faucets, as it can damage fixture finishes and leave lingering odors in your drinking water lines.
If you lack these valves, hire a licensed plumber to install a dedicated service valve kit. Once installed, you can perform future maintenance yourself every year. If your water heater sits in an unheated utility shed or garage workspace, proper plumbing access is just as vital as having an electric heater for garage with thermostat controls to keep room temperatures safely above freezing.
When should you stop and call a licensed plumber?
Flushing mineral scale is safe for most homeowners, but certain warning signs require professional help. Stop immediately and call a licensed plumber if you encounter any of these issues:
- The smell of gas: If you detect a rotten egg odor near a gas unit, do not flip light switches or use a phone indoors. Leave the house right away and call your gas utility company from a safe distance outside.
- Water leaking inside the cabinet: Water dripping from behind the metal casing or burner assembly indicates a cracked heating chamber. Internal leaks cannot be fixed with a flush and usually require replacing the heater.
- Error codes that remain after servicing: If error messages continue after a thorough flush and screen cleaning, a sensor, fan motor, or circuit board may have failed.
- Stuck or corroded valves: Never force frozen valve handles with a pipe wrench. Snapping an old valve can cause severe indoor water flooding.
- Scorched electrical components: If an electric unit shows melted wire connectors or repeatedly trips its double-pole circuit breaker, shut off power and contact an electrician. In compact utility areas like manufactured housing, matching electrical safety rules is essential, just as it is when selecting an approved heater for mobile home installations.
What features matter in a replacement service valve kit?
If your setup needs new maintenance taps, picking a durable valve kit makes annual maintenance effortless. Choose a set crafted from heavy forged, lead-free brass that stands up to water pressure and resists rust.
Look for full-port ball valves. These valves feature an internal opening matching the full width of your pipes, which keeps water pressure strong throughout your home. Color-coded handles, red for hot and blue for cold, prevent mistakes when connecting flush lines.
Ensure the kit includes dedicated drain ports with threaded brass caps and an integrated port for a pressure relief valve. Finally, check your water line diameter, as standard residential tankless units require 3/4-inch threaded fittings.

- BWP Score9.7
BWP Score is a ranking system developed by Bestwinterproducts.com. BWP score has no relationship or impact from any manufacturers or sales agent websites. Learn more
- Brandlong term

- BWP Score9.1
BWP Score is a ranking system developed by Bestwinterproducts.com. BWP score has no relationship or impact from any manufacturers or sales agent websites. Learn more
- BrandBRIGHTDECK

- BWP Score8.9
BWP Score is a ranking system developed by Bestwinterproducts.com. BWP score has no relationship or impact from any manufacturers or sales agent websites. Learn more
- BrandHYDRO MASTER

- BWP Score8.9
BWP Score is a ranking system developed by Bestwinterproducts.com. BWP score has no relationship or impact from any manufacturers or sales agent websites. Learn more
- BrandLIULO TOOL
- BWP Score8.2
BWP Score is a ranking system developed by Bestwinterproducts.com. BWP score has no relationship or impact from any manufacturers or sales agent websites. Learn more
- BrandIococee

- BWP Score7.7
BWP Score is a ranking system developed by Bestwinterproducts.com. BWP score has no relationship or impact from any manufacturers or sales agent websites. Learn more
- BrandKAINGA

- BWP Score7.1
BWP Score is a ranking system developed by Bestwinterproducts.com. BWP score has no relationship or impact from any manufacturers or sales agent websites. Learn more
- BrandMGGPAXXT
Last update on 2026-10-16 / Affiliate links / Images, Product Titles, and Product Highlights from Amazon Product Advertising API
FAQs
Can you use regular vinegar instead of special cleaning chemicals?
Yes, standard white food-grade vinegar is ideal for tankless heaters. Its mild acidity dissolves calcium and magnesium scale without damaging copper pipes or eating away rubber gaskets. Chemical descalers work faster, but white vinegar is inexpensive, non-toxic, and safe for home plumbing.
How long does a tankless water heater flush take?
A full maintenance session takes about 75 minutes. Setting up your bucket, pump, and hoses requires roughly 15 minutes. The pump circulates vinegar through the heating chamber for 45 to 60 minutes, followed by a 5-minute clean water rinse and a quick inlet screen wash.
Will servicing a tankless water heater lower your utility bills?
Yes, regular servicing keeps your energy bills lower by eliminating insulating scale on the heating chamber walls. Mineral buildup forces gas burners or electric elements to run longer to heat the same volume of water. Clearing the scale restores quick heat transfer, reducing energy waste.
What happens if you never service your tankless water heater?
Neglecting maintenance leads to thick mineral crusts that block water flow and cause water temperature fluctuations. The unit will overheat frequently and display warning codes. Over time, trapped heat can crack the heating chamber, causing internal leaks and premature unit replacement.


Best Warm Winter Scarves 2026 For Cozy Comfort

Best Green Ski Goggles 2026 For Clear Vision On Slopes

12 Best Corner Electric Fireplace 2026: My Ultimate Guide To Pick One

Best Battery Powered Snow Blower 2026 For Effortless Snow Clearing

Best Ski Goggles Under 30 Inches For Crisp Vision And Comfort

Best Cooling Scarf 2026 For Instant Relief And Comfort

Fake Snow for Grass: Create a Realistic Winter Lawn Display

Dimplex Prism Wall Mount Fireplace: Sleek Heat With Modern Flame Style





