How to Safely Start a Pilot Light on a Gas Fireplace

Locate the control knob under the hearth screen and twist it directly to the Pilot setting. Aligning this dial opens the startup channel, allowing you to press and hold the knob down to release gas while clicking the spark igniter. Once the small blue flame appears, keep that knob pressed down for thirty to sixty seconds so the heat safety sensor warms up, then turn the dial to On.
A few details can change this routine. Some units lack a push-button sparker and need a long wand lighter held near the pilot head instead. Newer fireplaces often feature electronic ignition, which lights automatically from a wall switch without any manual knob pressing. Gas lines that sat idle all summer also hold trapped air that must bleed out before fuel arrives. Follow the steps below to ignite your fireplace safely and fix the flame if it refuses to stay lit.
Essential Safety Checks Before Lighting Your Gas Fireplace
Sitting in front of a cold hearth on a chilly evening can make anyone impatient, but gas appliances require a steady hand and a quick safety survey. Natural gas and propane both carry an added odorant called mercaptan, which smells like rotten eggs or sulfur. This distinct scent warns you if unburned gas escapes into the living room. Before you reach for any buttons or strike a flame, take ten seconds to smell the air near the hearth floor. Gas is heavier than pure oxygen, so leaks often settle low to the carpet or tile.
If you catch a distinct smell of gas, do not touch any switches, do not grab a lighter, and do not try to ignite the fireplace. Open nearby windows, leave the house immediately with your family and pets, and call your local gas utility or fire department from a safe distance outside. If the air smells clean and neutral, you can safely inspect the fireplace area.
Take a quick look around the firebox to ensure the surroundings are safe before you open the lower access panel. The following checklist covers everything you need to confirm before attempting ignition:
- Check for clear space: Move blankets, throw pillows, curtains, and holiday decorations at least three feet away from the glass front and the lower hearth opening.
- Inspect the firebox: Look through the glass or mesh screen to confirm that artificial logs, ceramic stones, or decorative embers sit in their proper resting slots without resting directly on top of the pilot burner head.
- Confirm the main gas valve is open: Locate the inline shutoff valve, which is usually a small lever on the rigid pipe under the unit or a brass floor socket that requires a long turn key. The lever must sit parallel to the gas line to allow fuel flow.
- Look for clean burner ports: Check the pilot assembly bracket for spider webs, thick dust blankets, or pet hair, which frequently collect in the lower chamber during warm months.
Direct-vent gas fireplaces rely on a sealed glass window that must remain tightly latched during normal operation. Older B-vent or natural-draft models might feature open screens and an operable flue damper inside the chimney throat. If your fireplace vents up an open chimney, confirm the damper plate is propped open so exhaust fumes do not back up into your home. Knowing how to close fireplace damper plates when the heating season ends helps protect the pilot assembly from falling soot and drafts, but that pathway must stay open whenever gas burns.
Step-by-Step Instructions to Light a Standing Pilot Light
A standing pilot system uses a small continuous flame to keep the fireplace ready to ignite whenever you flip a wall switch or adjust the thermostat. Lighting this small flame requires supplying a steady stream of gas to the pilot orifice while generating a spark to catch the fuel. Once you access the lower control area behind the bottom decorative louver or access door, follow these steps in order.
Step 1: Locate the primary control knob. Under the fireplace floor, you will find a brass or plastic dial marked with three primary settings: OFF, PILOT, and ON. You will also see a push-button sparker (a mechanical piezo igniter button that produces an audible snap when pushed) mounted nearby on the metal bracket.
Step 2: Align the dial to the PILOT position. Turn the control knob clockwise to the OFF position first if it is not there already. Wait two full minutes to allow any residual fuel to clear away. Then, press down slightly on the knob and turn it counterclockwise until the word PILOT lines up with the fixed indicator mark or notch on the valve casting.
Step 3: Press and hold the knob to bleed trapped air. The knob has an internal spring that lets you depress it about a quarter of an inch. Pressing this knob down bypasses the internal safety valve and sends a small stream of gas straight to the pilot head. If your fireplace sat idle through the spring and summer, the tiny supply pipe is full of room air. Hold the knob down firmly for roughly 30 to 60 seconds to push that dead air out until fresh fuel arrives at the burner tip.
Step 4: Generate a spark to ignite the gas. Keep holding the control knob down with one hand. With your other hand, push the push-button sparker firmly and repeatedly, snapping it once every second. Look past the decorative logs toward the pilot hood to watch for a blue flame. If your fireplace does not have a push-button sparker, or if the internal wire failed, hold the flame of a long wand barbecue lighter right next to the pilot hood while pressing the valve knob.
Step 5: Continue holding the knob for 30 to 60 seconds. Do not release your thumb from the control knob the moment the flame appears. The pilot flame must heat the safety sensor sitting right beside the flame hood. Holding the knob down gives that sensor enough time to absorb thermal energy and send an electrical signal that holds the main safety valve open.
Step 6: Release the knob slowly and check the flame. Gently let go of the knob. It should pop back out toward you, and the small pilot flame should stay lit with a steady, quiet blue glow. If the flame flickers and immediately vanishes, wait one full minute for gas to clear, then repeat the process, holding the knob down a bit longer during Step 5.
Step 7: Turn the control knob to ON. Once the pilot flame stays lit on its own, turn the dial counterclockwise until the word ON aligns with the indicator mark. You can now use your fireplace wall switch, handheld remote, or thermostat dial to turn on the main burners.
Why the Pilot Flame Won't Stay Lit and How to Solve It
The most common and frustrating issue homeowners face is a pilot flame that catches fire beautifully while the knob is depressed, but dies the exact split second they let go. This problem is rarely a mystery; it is almost always caused by the heat safety sensor (often called a thermocouple or thermopile). This sensor is a small copper or steel rod positioned directly in the path of the pilot flame. When heated, the dissimilar metals inside the sensor generate a tiny electrical current, measuring only a few millivolts. That small charge powers an electromagnet inside the gas valve. As long as the sensor is hot, the magnet stays energized, holding the gas pathway open. If the sensor goes cold, the magnet drops, instantly snapping the gas supply shut to prevent raw gas from flooding your living space.
Over time, soot and carbon buildup coat the exterior of this metal sensor. Soot acts like a layer of insulation, preventing the small flame from transferring heat through the metal sheath. When this occurs, the sensor never produces enough millivolts to keep the magnet engaged. You can solve this by letting the fireplace cool down completely, turning the gas valve to OFF, and gently rubbing the metal sensor rod with an old dry toothbrush, a clean kitchen scouring pad, or fine emery cloth. Avoid coarse sandpaper that can gouge the metal. Wiping away the dark gray carbon film restores clean metal contact so the pilot flame can heat the probe quickly.
Another frequent reason for flame failure is poor flame impingement. The pilot flame should look crisp, mostly blue with slight yellow tips, and it must wrap directly around the upper third of the sensor probe. If dust or spider webs partially block the pilot nozzle, the flame might burn weak, lazy, and yellow, drifting away from the sensor. You can clear minor debris from the pilot opening by blowing a brief burst of compressed air through a narrow straw directed right into the pilot assembly bracket.
Drafts inside the firebox can also pull the flame away from the heat sensor. If your home has a strong exhaust fan running in the kitchen or bathroom, it can create negative air pressure that pulls air down the fireplace flue. Similarly, opening a window on a windy day can create a cross-draft that knocks the small pilot flame off target. Turn off high-powered kitchen range hoods and verify that the glass viewing front is securely clamped in place before deciding that a mechanical part has failed.
Standing Pilot Versus Electronic Ignition: Spotting the Difference
Not every gas fireplace uses a standing pilot that burns continuously. Many modern hearth appliances manufactured in recent years feature intermittent pilot ignition, commonly known as an electronic ignition system. Trying to light an electronic ignition system using manual standing pilot steps will leave you confused because the controls work in an entirely different way.
You can quickly identify which system rests under your hearth by checking the components behind the lower access grille. A standing pilot system features a large manual dial that you can push inward and rotate between OFF, PILOT, and ON. It usually sits right next to a mechanical push button that makes a loud, spring-loaded clacking sound when struck. It does not require household electricity or batteries to keep the pilot lit, meaning it will warm your room even during a winter power outage.
An electronic ignition system, by contrast, does not have a manual gas dial that you press and hold down. Instead, you will see a control module box, multiple thin electrical wires, and often a battery backup compartment holding AA or D-cell batteries. Rather than keeping a constant flame burning twenty-four hours a day, an electronic system stays completely dark until you flip the wall switch or press a button on a remote. Once turned on, an electronic spark generator clicks rapidly, ignites the pilot flame, confirms ignition with a flame-sensing rod, and immediately lights the main burner logs. When you turn the fireplace off, the pilot flame shuts down entirely to conserve energy.
If you have an electronic system that refuses to light, holding a barbecue lighter to the burner is unsafe. Electronic systems rely on sensitive circuit boards and automated valves. If the unit clicks continuously without lighting, the common culprit is a set of dead backup batteries in the lower tray, a loose ground wire, or a dirty flame sensor rod. Changing the batteries or checking that the appliance is plugged into its standard 120-volt wall outlet under the hearth usually resolves the issue without any manual flame handling.
Regardless of which system you own, there are critical warning signs that mean you should stop troubleshooting immediately and shut off the main gas line:
- Sustained gas smells: Any sulfur odor that lingers for more than a few minutes after an attempted lighting cycle.
- Hissing sounds without ignition: The sound of gas rushing out of a pipe when the fireplace controls are switched off.
- Heavy black soot accumulations: Thick velvet-like soot collecting on the firebox walls, logs, or glass within minutes of operation, indicating improper combustion.
- Corroded pilot tubes: Any visible green crust, rust holes, or kinks along the thin aluminum or copper gas supply lines running to the pilot bracket.
Choosing Replacement Pilot Hardware When Parts Wear Out
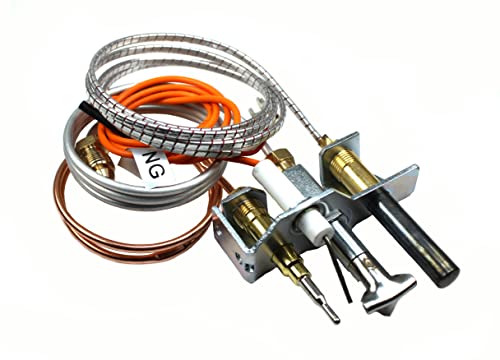
When cleaning the heat safety sensor or clearing dust from the burner fails to restore a reliable flame, the physical components of the pilot assembly have likely reached the end of their service life. Decades of continuous exposure to open fire eventually degrade the internal metals of the thermocouple, warp the flame deflector hood, and crack the ceramic insulator that holds the spark electrode. When this happens, replacing the entire pilot assembly bracket is far safer and more effective than attempting to patch together worn individual wires.
Before purchasing replacement fireplace hardware, the most crucial specification you must confirm is your fuel source. Natural gas and liquid propane operate under drastically different supply pressures. Natural gas enters the fireplace at lower pressure through a wider burner orifice, whereas liquid propane arrives under higher pressure and requires a much smaller opening to meter the fuel safely. Installing a pilot assembly fitted with a natural gas orifice onto a propane line will produce a dangerously tall, roaring torch flame. Conversely, running natural gas through a propane orifice produces a tiny, starving flame that cannot heat the safety sensor. Many universal replacement assemblies arrive with a natural gas nozzle pre-installed and include a spare propane orifice in the package, but you must confirm that the nozzle matches your household fuel supply before securing it in place.
Always verify the exact model number of your fireplace before ordering parts. You can find this information stamped onto a metal rating plate or chain-tethered tag tucked beneath the firebox floor. Match the replacement assembly bracket shape, screw hole spacing, and tubing lengths to the original factory specifications. Ensuring that the pilot tube connectors, sparker wire terminal, and safety sensor lead match your existing gas control valve saves time and keeps your hearth running safely through the winter season.

- BWP Score9.2
BWP Score is a ranking system developed by Bestwinterproducts.com. BWP score has no relationship or impact from any manufacturers or sales agent websites. Learn more
- BrandMidwest Hearth
- BWP Score8.8
BWP Score is a ranking system developed by Bestwinterproducts.com. BWP score has no relationship or impact from any manufacturers or sales agent websites. Learn more
- Brandpalart

- BWP Score8.8
BWP Score is a ranking system developed by Bestwinterproducts.com. BWP score has no relationship or impact from any manufacturers or sales agent websites. Learn more
- BrandCriditpid

- BWP Score6.8
BWP Score is a ranking system developed by Bestwinterproducts.com. BWP score has no relationship or impact from any manufacturers or sales agent websites. Learn more
- BrandHipoilk
Last update on 2026-10-02 / Affiliate links / Images, Product Titles, and Product Highlights from Amazon Product Advertising API
Frequently Asked Questions
Can I use a handheld wand lighter if the built-in clicker stops working?
Yes, you can safely use a long barbecue wand lighter to ignite the pilot flame manually. Turn the control dial to the PILOT position, push and hold the knob down to release fuel, and place the lighter flame right beside the pilot burner hood. Never use a standard pocket lighter or a short wooden match, as your fingers will be too close to the gas port if the fuel catches quickly.
Should I leave the gas fireplace pilot light burning all summer long?
You can turn the pilot light off during warm summer months to conserve fuel and prevent the glass from generating mild heat in an already warm room. Leaving it on, however, does keep the interior of the firebox warm and dry, which prevents moisture buildup and discourages spiders from spinning webs inside the burner ports. If you turn it off for the summer, be prepared to hold the knob down for up to a minute in the fall to purge air from the pipe before it relights.
How long should I wait before trying to relight the pilot if it fails?
Wait at least two to five full minutes between failed attempts before striking another spark. This waiting period allows any unburned gas that gathered inside the firebox chamber to dissipate safely into the room or out through the chimney flue. Attempting to spark the igniter immediately after a failed cycle can cause a sudden pop or flare-up of accumulated gas trapped behind the logs.


12 Best Corner Electric Fireplace 2026: My Ultimate Guide To Pick One

Dimplex Prism Wall Mount Fireplace: Sleek Heat With Modern Flame Style
Best Electric Fireplace Insert for Large Room Heating and Style

Best 40 Inch Electric Fireplace Insert 2026 - Cozy Ambiance with Modern Power
Top 12 Best Quality Electric Fireplace 2026 - Buying Guides

Best Wall Mount Electric Fireplace 2026 for Ultimate Comfort and Style

How to Start Monessen Fireplace: A Step-by-Step Guide

How to Whitewash Rock Fireplace: Simple Steps to Refresh Your Space